Posts

Showing posts from 2023

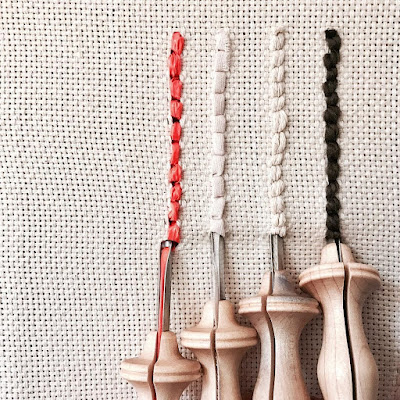
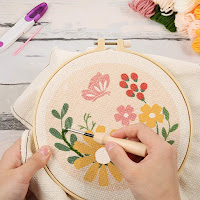
Technique Tuesday: Weaving Bracelets Using a Bracelet Loom

Image
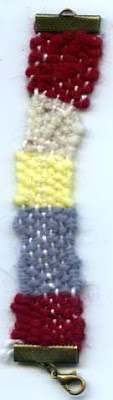
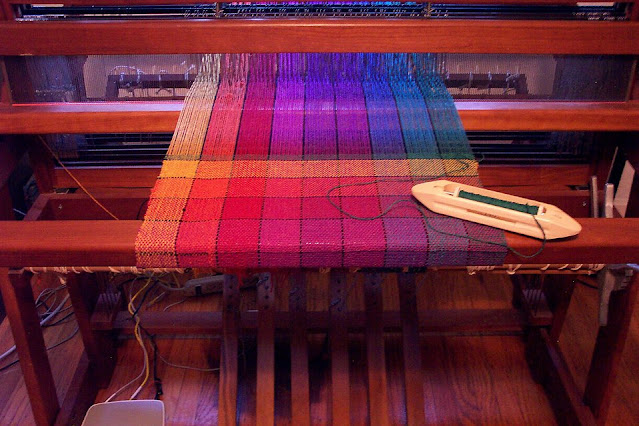
This summer I watched quite a few crafting videos online and wondered if I should incorporate my own spun fabric into my sewing & fabric art mix. Before I dropped hundreds of dollars on a large weaving loom I decided that I should try something a wee bit smaller to get my feet wet and see if it was something I really wanted to do or a whim. So, I purchased the Bracelet Loom by Leisure Art . Now it doesn't have all of the fancy moving parts that a Rigid Heddle Loom has, but the basic concepts are there and it gives me the opportunity to flex or scratch that itch. My $8.99 + tax investment in the loom along with a purchase of embroidery floss and what I thought was embroidery floss, but turned out to be craft thread, all from Hobby Lobby got me started. I later shopped online shopping for clasps to finish the bracelet. I opted for brushed brass.  I was all set to start my venture in weaving. That is until I read the instructions and started scratching my head and weeping. I neede

Technique Tuesday: Assembling the 10 Spool Thread Stand

Image
The one thing single needle embroidery machines do not have is a thread stand, with needles threaded for color changes. But that doesn't mean we home sewists, hobbyists, designers, thread artists are limited. There are tools on the market to ease the burden of changing colors when machine embordering our designs. I personally own this 10 spool thread stand and it is wonderful. I don't just use it when I embroider, I also use it for large thread spools that don't fit neatly on my sewing machine and when I plan to stitch in different thread colors. I purchased the ten thread spool, thread stand. There is a 20 version on the market, but I thought that was too many for me. There are also 1, and 2 thread stands too. Video Ready to start sewing your project? Please leave your comments below on what you plan on making .  This blog isn't sponsored If you enjoy reading my blog posts please consider supporting my creative endeavors by donating via  PayPal Me  or  Buying Me a Cup

Technique Tuesday: Use Ban-Roll to Sew Narrow Hems

Image
Whether you use the roll hem foot or manually fold those hems, it's always good to have another technique in your sewing toolbox. This Technique Tuesday, Downtown Tailoring will demonstrate the Ban-Roll technique to sew narrow hems. I haven't tried it yet as I don't have a project that requires narrow hems at the moment, but if you give it a try, let me know in the comments below. Video This technique is from Downtown Tailoring located in Ottawa, Ontario Canada. Ready to start sewing your project? Please leave your comments below on what you plan on making .  This blog isn't sponsored If you enjoy reading my blog posts please consider supporting my creative endeavors by donating via  PayPal Me  or  Buying Me a Cup of Tea/Coffee .  

Technique Tuesday: Yarn Couching with the Rolled Hem Foot

Image
Hi Everybody, recently I learned that you can do yarn couching using the Rolled Hem foot. So, no need to purchase a Couching foot. It also means that the Rolled Hem foot has multiple uses, which is great. When couching yarn you can use thread the color of the yarn so that the yarn stands out or choose to use a contrasting color on the yarn so the stitches stand out too. And lastly you can use nylon microfilament thread so that the stitches disappear and the yarn seems to float on the garment.  I did a test sew using my old standard, an old bedsheet. In the image above I used  medium weight size 4 worsted acrylic yarn, a wide ribbon, and sari yarn that I purchased to felt with. The three white cords are craft yarn that I corded, something I will discuss in a future blog.  I purchased monofilament thread  Sew-ology1001 Transparent Nylon Thread from Hobby Lobby on sale for .99.  I also purchased a larger set of 6 additional Rolled Hem feet to create hems in the following sizes: 3mm (1/8&

Technique Tuesday: Stacking Stitches

Image
Hello everyone, this Technique Tuesday we are focusing on decorative stitches that come with sewing machines. Specifically  sewing two decorative stitches in different colors on top of each other: stacking stitches. This summer I finally created a stitch chart of all of the stitches that came with my sewing machine. My machine comes with 250 stitches, so I repurposed items I had in my house to create a functional, nothing fancy stitch book.   I used an old 3-ring binder, an old bed sheet that I cut up, 40wt and 60wt thread and stitched out all of my stitches. Experts, that is seasoned sewists, recommend that you create a stitch chart or guide because the stitches on your machine or in your machine's guide will stitch out differently on fabric. My guide isn't fancy like some you will see on blogs, PBS or YouTube channels. My guide is practical. I can flip through it, see the stitches I want to sew and stitch them out. I also included quick reference guides with tips on whi

Technique Tuesday: Machine Embroidered Greeting Cards

Image
I love machine embroidery and I also love making handmade cards. So, imagine how I felt to learn that embroidering cards is trending now. Some people are using dies that are specifically made to die cut and then use embroidery floss to create the card front or insert.  Circular Stitch Background Metal Cutting Dies And that is a lovely thing to do, however it is limiting. Sure you can change colors of thread & cardstock to make each card different, but if you truly want something unique, combining machine embroidery will allow you to do just that. And if you digitize your own designs or edit an existing design to customize as your own, you will truly have a one of a kind design. Video Here are some tips for creating unique custom, bespoke handmade cards by the Embroidery Library Ready to start crafting your project? Please leave your comments below on what you plan on making .  This blog isn't sponsored If you enjoy reading my blog posts please consider supporting my creative e

Technique Tuesday: Punch Needling Stitch Size & Row Space

Image
Ok, so you've got your fabric, yarn, needles, and design that you want to tuft aka punch needle, but you're not sure how large your stitches should be. How far to space them apart, and which side of the design is the right side. This Technique Tuesday we will cover that. You'll learn how to properly space your stitches. How wide your rows should be and how changing stitch length changes the dynamic of your fabric art/rug. Video: Stitch Size & Row Spacing This video is from the Oxford Company. The Oxford Company has a great selection of blogs called # OxCoPALs and videos that walk you through the basics of Punch Needling as well as Rug Hooking. I recommend going over there to learn more.  Ready to start crafting your project? Please leave your comments below on what you plan on making .  This blog isn't sponsored If you enjoy reading my blog posts please consider supporting my creative endeavors by donating via  PayPal Me  or  Buying Me a Cup of Tea/Cof

Technique Tuesday: Fabric for Punch Needling

Image
This Technique Tuesday we will learn how to select the appropriate fabric to work best with our punch needling projects. I do needle felting with an embellisher machine and by hand. And I love that you can use various substrates and felt with them. It puts the MIX in mix media projects. However, when it comes to hand embroidery, the fabric you construct your project on is quite important. Consider the following fabric options: Monk Cloth : This is a tightly woven fabric that is made from 100% cotton. It is a good choice for punch needling because it is durable and has a nice texture. The Dorr Mill Monk's cloth is woven specifically for punch needle art. Try to find one that has 12-14 holes in it. It is a self healing fabric. Linen : This is a natural fiber fabric that is known for its strength and durability. Linen is a good choice for punch needling because it is easy to work with and has a nice drape. Boao Linen is a great choice for making heirloom projects. It is a self

Technique Tuesday: Punch Needles Types

Image
Last week we learned about the Punch Needling technique. This Technique Tuesday we will learn about the variety of punch needles on the market and determine which one will work best with our projects. Oxford Punch Needles Video: Which Punch Needle to Purchase This video purchasing guide is from Vera at Studio VerSie.   Oxford is the cadillac of Punching Needles, this video is a guide to their selection of needles. The Oxford Company has a great selection of blogs called # OxCoPALs and videos that walk you through the basics of Punch Needling as well as Rug Hooking. I recommend going over there to learn more. Especially how to transfer your pattern to the backing fabric . Ready to purchase some punch needles and work on a custom fabric art project? Please leave your comments below .  This blog isn't sponsored If you enjoy reading my blog posts please consider supporting my creative endeavors by donating via  PayPal Me  or  Buying Me a Cup of Tea/Coffee .  

Technique Tuesday: Punch Needling

Image
Hey Everybody, I am still leaning hard on the fabric art trends. This is my 2023 - creating art that inspires and elicits joy. Well, in mid July 2023 I discovered a new fabric art technique. It is new to me, but not new in general. It is a technique that is becoming quite popular as a relaxing way to get into creating fabric art, pillows, rugs, whatever your heart desires, and I am talking about Punch Needling! Images: Pllieay Punch Needle Embroidery Starter Kits Punch needling is a type of embroidery that uses a punch needle tool to create loops of yarn on a fabric. The punch needle tool has a hollow shaft that the yarn is threaded through, and a sharp point that is used to punch the yarn through the fabric. The yarn loops are then pulled tight, creating a fabric with a dense, textured surface. Punch needling can be used to create a variety of projects, including wall hangings, pillows, rugs, and coasters. It is a relatively easy techni

Technique Tuesday: How to Get Started with Weaving

Image
I hope you enjoyed last week's technique and got started making your own loom. Today's technique will focus on how to get started with weaving and we will learn how to begin weaving on the cardboard loom.  Whether you are using the loom you created last week or working with a loom you purchased these tips should set you up for a successful start to weaving on a loom. Video: Weaving for Beginners This technique is by Fibers & Design Weaving , and it picks up from last week's blog on how to build your own cardboard loom. Recommend reading that blog and watching that video first. How's Your Confidence Level? Ready to get started on creating your own custom woven designs? Please leave your comments below.  This blog isn't sponsored If you enjoy reading my blog posts please consider supporting my creative endeavors by donating via  PayPal Me  or  Buying Me a Cup of Tea/Coffee .

Technique Tuesday: How to Create a Cardboard Weaving Loom

Image
Hi Everybody, hope you are doing well this fine August day. Today's Technique Tuesday we will continue to focus on fabric arts and construction. Let's jump into woven fabrics. Better yet, let's learn how to CREATE our own woven fabrics. To do that we need tools. And one of the best, yet ancient tools to create woven fabrics is the loom.  Today we will learn how to create our own weaving loom out of cardboard.  Video This technique is by Fibers & Design Weaving : What do you think about today's technique? Will you try it? Please leave your comments below.  This blog isn't sponsored If you enjoy reading my blog posts please consider supporting my creative endeavors by donating via  PayPal Me  or  Buying Me a Cup of Tea/Coffee .

Technique Tuesday: Mattress Stitch

Image
How to Join One or More Knitted/Crocheted Panels Today's Technique Tuesday we are going to learn how to join two finished panels to complete your design, so that the join is invisible.  This is beneficial when you are connecting two completed panels and you do not want a noticeable seam in the garment/design. This tip is from Heart Hook Home . Tools You'll need a tapestry needle with a large hole and blunt tip and the long tail of yarn  the same color of the panels that you are joining. You can purchase an excellent kit of a variety of tapestry needles on Amazon .   Video: How to Sew two pieces of Crochet Using the Mattress Stitch This blog isn't sponsored If you enjoy reading the my blog posts please consider supporting my creative endeavors by donating via  PayPal Me  or  Buying Me a Cup of Tea/Coffee .

Having Fun Sewing Decorative Stitches in a Circle

Image
The decorative stitches on the Singer Legacy 340 / 300 sewing & embroidery machine are beautiful. I finally stitched out all 250 of the stitches and placed them in a binder for future reference. I also created my own circular stitch tool so I can stitch out large circles using the decorative stitches. I think they came out beautifully. The circles on the white background are my first attempt, so you see that blue incomplete circle went wonky because I forgot to secure the pin tool. I used a mixture of polyester overlock and embroidery thread. The second set of circles I wanted to stitch out large circle. The largest in this group is 8 inches all the way to 2 inches. I am using Simthread polyester embroidery thread . When I used Madeira Rayon the thread kept breaking. But I have zero issues with Simthread. Thread Colors and Stitch Numbers 2" Circle Color #507 Emerald Green | Decorative Stitch # 124 3" Circle Color #800 Red | Decorative Stitch # 75 4" Circle Col

Technique Tuesday: How to Weave in Ends

Image
How to Weave in Ends after completing a Knitting/Crochet Project You've finished your fabric project, but now you have all of these ends. Today's Technique Tuesday we are going to show you how to weave in your ends for a professional finished project.  Tools You'll need a tapestry/yarn needle with a large hole. You can purchase an excellent kit of a variety of  tapestry needles on Amazon .   Video: How to WEAVE IN ENDS Perfectly & Easily that Won't Come Undone! This technique is from Nichole @ Nicki's Homemade Crafts on a crochet project. How to Weave in Ends for Knitted Projects to Maintain Elasticity This technique is from Staci @ Very Pink. This blog isn't sponsored If you enjoy reading my blog posts please consider supporting my creative endeavors by donating via  PayPal Me  or  Buying Me a Cup of Tea/Coffee .

Technique Tuesday: Russian Join - Yarn

Image
How to Join two Pieces of Yarn Today's Technique Tuesday we are going to learn how to join two pieces of yarn, so that the join is invisible.  This is beneficial when you are changing skeins of yarn or when you are changing colors. This tip is from Heart Hook Home . Tools You'll need a tapestry needle with a large hole and pointy tip and two skeins or peices of yarn that you are joining. You can purchase an excellent kit of a variety of tapestry needles on Amazon .   Video: How to Make a Russian Join for Crocheting and Knitting This blog isn't sponsored If you enjoy reading the my blog posts please consider supporting my creative endeavors by donating via  PayPal Me  or  Buying Me a Cup of Tea/Coffee .

Technique Tuesday: How to Make a Beanie

Image
How to Make a Beanie with a Sentro Knitting Machine Today's Technique Tuesday we are going to learn how to make a beanie using the Sentro Knitting Machine  in about 20 minutes.  I made my first beanie a few weeks ago and was shocked how quickly I was able to make it with no knitting experience. I have made afghan throws & scarves in the past and crochetted a throw, but never knitted, frankly because it seemed like a really difficult thing to do with two needles. The Sentro Knitting Machine makes knitting a cinch. This 48 pin machine (it comes in smaller sizes) will make knits of a certain size. But that's ok, because the size of the pins are the average sized knits for beanies/hats, scarves, gloves, and sweaters aka jumpers. This is beneficial when you are connecting two completed panels and you do not want a noticeable seam in the garment/design.  Tools 1. Sentro Knitting Machine (or another round knitting machine like the Aldi). You can purchase one from their webs

Wednesday Wisdom: Carpal Tunnel Nerve Glide Exercises

Image
If you are a keyboard warrior, a writer, or do any extensive work with your hands you are at risk for developing carpal tunnel syndrome. This is an issue where the nerve is pinched. There are nerve glide exercises you can do to alleviate this syndrome.  Video This blog isn't sponsored If you enjoy reading my blog posts please consider supporting my creative endeavors by donating via  PayPal Me  or  Buying Me a Cup of Tea/Coffee .