Posts

Showing posts from August, 2023

Technique Tuesday: Punch Needling

Image
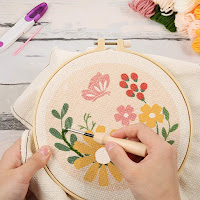
Hey Everybody, I am still leaning hard on the fabric art trends. This is my 2023 - creating art that inspires and elicits joy. Well, in mid July 2023 I discovered a new fabric art technique. It is new to me, but not new in general. It is a technique that is becoming quite popular as a relaxing way to get into creating fabric art, pillows, rugs, whatever your heart desires, and I am talking about Punch Needling! Images: Pllieay Punch Needle Embroidery Starter Kits Punch needling is a type of embroidery that uses a punch needle tool to create loops of yarn on a fabric. The punch needle tool has a hollow shaft that the yarn is threaded through, and a sharp point that is used to punch the yarn through the fabric. The yarn loops are then pulled tight, creating a fabric with a dense, textured surface. Punch needling can be used to create a variety of projects, including wall hangings, pillows, rugs, and coasters. It is a relatively easy techni

Technique Tuesday: How to Get Started with Weaving

Image
I hope you enjoyed last week's technique and got started making your own loom. Today's technique will focus on how to get started with weaving and we will learn how to begin weaving on the cardboard loom.  Whether you are using the loom you created last week or working with a loom you purchased these tips should set you up for a successful start to weaving on a loom. Video: Weaving for Beginners This technique is by Fibers & Design Weaving , and it picks up from last week's blog on how to build your own cardboard loom. Recommend reading that blog and watching that video first. How's Your Confidence Level? Ready to get started on creating your own custom woven designs? Please leave your comments below.  This blog isn't sponsored If you enjoy reading my blog posts please consider supporting my creative endeavors by donating via  PayPal Me  or  Buying Me a Cup of Tea/Coffee .

Technique Tuesday: How to Create a Cardboard Weaving Loom

Image
Hi Everybody, hope you are doing well this fine August day. Today's Technique Tuesday we will continue to focus on fabric arts and construction. Let's jump into woven fabrics. Better yet, let's learn how to CREATE our own woven fabrics. To do that we need tools. And one of the best, yet ancient tools to create woven fabrics is the loom.  Today we will learn how to create our own weaving loom out of cardboard.  Video This technique is by Fibers & Design Weaving : What do you think about today's technique? Will you try it? Please leave your comments below.  This blog isn't sponsored If you enjoy reading my blog posts please consider supporting my creative endeavors by donating via  PayPal Me  or  Buying Me a Cup of Tea/Coffee .

Technique Tuesday: Mattress Stitch

Image
How to Join One or More Knitted/Crocheted Panels Today's Technique Tuesday we are going to learn how to join two finished panels to complete your design, so that the join is invisible.  This is beneficial when you are connecting two completed panels and you do not want a noticeable seam in the garment/design. This tip is from Heart Hook Home . Tools You'll need a tapestry needle with a large hole and blunt tip and the long tail of yarn  the same color of the panels that you are joining. You can purchase an excellent kit of a variety of tapestry needles on Amazon .   Video: How to Sew two pieces of Crochet Using the Mattress Stitch This blog isn't sponsored If you enjoy reading the my blog posts please consider supporting my creative endeavors by donating via  PayPal Me  or  Buying Me a Cup of Tea/Coffee .

Having Fun Sewing Decorative Stitches in a Circle

Image
The decorative stitches on the Singer Legacy 340 / 300 sewing & embroidery machine are beautiful. I finally stitched out all 250 of the stitches and placed them in a binder for future reference. I also created my own circular stitch tool so I can stitch out large circles using the decorative stitches. I think they came out beautifully. The circles on the white background are my first attempt, so you see that blue incomplete circle went wonky because I forgot to secure the pin tool. I used a mixture of polyester overlock and embroidery thread. The second set of circles I wanted to stitch out large circle. The largest in this group is 8 inches all the way to 2 inches. I am using Simthread polyester embroidery thread . When I used Madeira Rayon the thread kept breaking. But I have zero issues with Simthread. Thread Colors and Stitch Numbers 2" Circle Color #507 Emerald Green | Decorative Stitch # 124 3" Circle Color #800 Red | Decorative Stitch # 75 4" Circle Col

Technique Tuesday: How to Weave in Ends

Image
How to Weave in Ends after completing a Knitting/Crochet Project You've finished your fabric project, but now you have all of these ends. Today's Technique Tuesday we are going to show you how to weave in your ends for a professional finished project.  Tools You'll need a tapestry/yarn needle with a large hole. You can purchase an excellent kit of a variety of  tapestry needles on Amazon .   Video: How to WEAVE IN ENDS Perfectly & Easily that Won't Come Undone! This technique is from Nichole @ Nicki's Homemade Crafts on a crochet project. How to Weave in Ends for Knitted Projects to Maintain Elasticity This technique is from Staci @ Very Pink. This blog isn't sponsored If you enjoy reading my blog posts please consider supporting my creative endeavors by donating via  PayPal Me  or  Buying Me a Cup of Tea/Coffee .